I was following this guide, from where I take the picture above. This post is one stupid log of how to do the same for CentOS 8 stream. First we get the java packages:
tar -xvf eclipse-java-2023-12-R-linux-gtk-x86_64.tar.gz
cd eclipse
And run it (./eclipse). First time it runs it’s going to ask you for a workspace folder (eclipse-workspace). It throws on terminal/konsole a lot of messages but I get the IDE window, so fine. Extra content: here medium productivity tips and here tutorialtips for eclipse. I’m not sure I’m going to move quickly to this one but I just wanted to know how to run it on CentOS 8 stream. And it runs 🙂
Well another mini-post that goes back in time because I’m still willing to write something meaningful today. But this bit can’t be forgotten.
Problem: I have one computer that doesn’t report its name as I want. For example,
#> hostname
mycomputer.domain.org
Solution: We edit /etc/hostname and reload it using the old system tool. In brief:
#> more /etc/hostname
mycomputer.domain.org
# edit the file, change it to mycomputer
#> more /etc/hostname
mycomputer
#> hostname
mycomputer.domain.org
# now we force the hostname to be reloaded
#> hostname -F /etc/hostname
#> hostname
mycomputer
Sorry it’s again Monday and on Monday some of us work. My work so far is to install this or that here or there. As you heard me complain about it before, we now handle quite some different systems, but my favourite so far is CentOS 8 stream. Because “some” things from CentOS 7 still work on CentOS 8 stream, and being the lazy bastard I am this means I will not need to do it again. Anyway. Non-default openmpi installation. Below my pipeline with comments (so do not cut & copy)
# wget https://download.open-mpi.org/release/open-mpi/v3.1/openmpi-3.1.6.tar.bz2
# tar -xf openmpi-3.1.6.tar.bz2
# cd openmpi-3.1.6
# mkdir build
# cd build
# ../configure --prefix=/opt/openmpi-3.1.6

... some checks here, it may take for a while...

config.status: executing libtool commands

Open MPI configuration:
-----------------------
Version: 3.1.6
Build MPI C bindings: yes
Build MPI C++ bindings (deprecated): no
Build MPI Fortran bindings: no
MPI Build Java bindings (experimental): no
Build Open SHMEM support: yes
Debug build: no
Platform file: (none)

Miscellaneous
-----------------------
CUDA support: no
PMIx support: internal

Transports
-----------------------
Cisco usNIC: no
Cray uGNI (Gemini/Aries): no
Intel Omnipath (PSM2): no
Intel SCIF: no
Intel TrueScale (PSM): no
Mellanox MXM: no
Open UCX: no
OpenFabrics OFI Libfabric: no
OpenFabrics Verbs: no
Portals4: no
Shared memory/copy in+copy out: yes
Shared memory/Linux CMA: yes
Shared memory/Linux KNEM: no
Shared memory/XPMEM: no
TCP: yes

Resource Managers
-----------------------
Cray Alps: no
Grid Engine: no
LSF: no
Moab: no
Slurm: yes
ssh/rsh: yes
Torque: no

OMPIO File Systems
-----------------------
Generic Unix FS: yes
Lustre: no
PVFS2/OrangeFS: no

# make

... some make here, it may take for a while...

# make install-strip
Obviously we can build an ansible formula out of this. It will look like this:
I was looking for a flexible and simple project management tool since I installed Taskcafe on a docker. It’s not that it’s free, it’s that it’s very easy to install, so easy that I’m so ashamed to write it down that I postponed the publication of this HOWTO. Lately I’m being lucky with the installs, I guess because I’m using a modern OS. Without further delay, here’s my installation story:
FragPipe is a Java Graphical User Interface (GUI) for a suite of computational tools enabling comprehensive analysis of mass spectrometry-based proteomics data. And I can’t continue reading without regretting about my life choices 🙂
Let’s install this. First of couse we need the right Java. We check the one we have installed, then remove it and install the “good” one.
Complete! ## > java -version openjdk version "11.0.18-ea" 2023-01-17 LTS OpenJDK Runtime Environment (Red_Hat-11.0.18.0.9-0.3.ea.el8) OpenJDK 64-Bit Server VM (Red_Hat-11.0.18.0.9-0.3.ea.el8)
Now we download the zip file on a convenient location, unzip it, and go as indicated to the /bin subfolder. The GUI opens, even through ssh! Done. This is my output (for the records).
/opt/local/software/fragpipe/bin ## > ./fragpipe
DATE org.openide.util.ImageUtilities$CachedLookupLoader getLoader
WARNING: No interface org.openide.util.spi.SVGLoader
instance found in ProxyLookup(class=class
org.openide.util.Lookup$DefLookup)->
[MetaInfServicesLookup
[jdk.internal.loader.ClassLoaders$AppClassLoader@55054057],
SingletonLookup
[jdk.internal.loader.ClassLoaders$AppClassLoader@55054057]]
DATE org.openide.util.ImageUtilities getIcon
INFO: No SVG loader available for loading
jar:file:/opt/local/software/fragpipe/
lib/org-netbeans-swing-outline-RELEASE200.jar!
/org/netbeans/swing/etable/columns.svg
Note. If you don’t have the right Java the error looks like this:
## > ./fragpipe
Error: A JNI error has occurred, please check your installation and try again
Exception in thread "main" java.lang.UnsupportedClassVersionError: com/dmtavt/fragpipe/FragPipeMain has been compiled by a more recent version of the Java Runtime (class file version 53.0), this version of the Java Runtime only recognizes class file versions up to 52.0
at java.lang.ClassLoader.defineClass1(Native Method)
at java.lang.ClassLoader.defineClass(ClassLoader.java:756)
at java.security.SecureClassLoader.defineClass(SecureClassLoader.java:142)
at java.net.URLClassLoader.defineClass(URLClassLoader.java:473)
at java.net.URLClassLoader.access$100(URLClassLoader.java:74)
at java.net.URLClassLoader$1.run(URLClassLoader.java:369)
at java.net.URLClassLoader$1.run(URLClassLoader.java:363)
at java.security.AccessController.doPrivileged(Native Method)
at java.net.URLClassLoader.findClass(URLClassLoader.java:362)
at java.lang.ClassLoader.loadClass(ClassLoader.java:418)
at sun.misc.Launcher$AppClassLoader.loadClass(Launcher.java:352)
at java.lang.ClassLoader.loadClass(ClassLoader.java:351)
at sun.launcher.LauncherHelper.checkAndLoadMain(LauncherHelper.java:621)
Sorry to bother you with installations HOWTO. Remember that you don’t need to read everything you get. Also, I don’t try to please anyone, I just want to leave some record of how it is done. Anyway, thanks for coming!
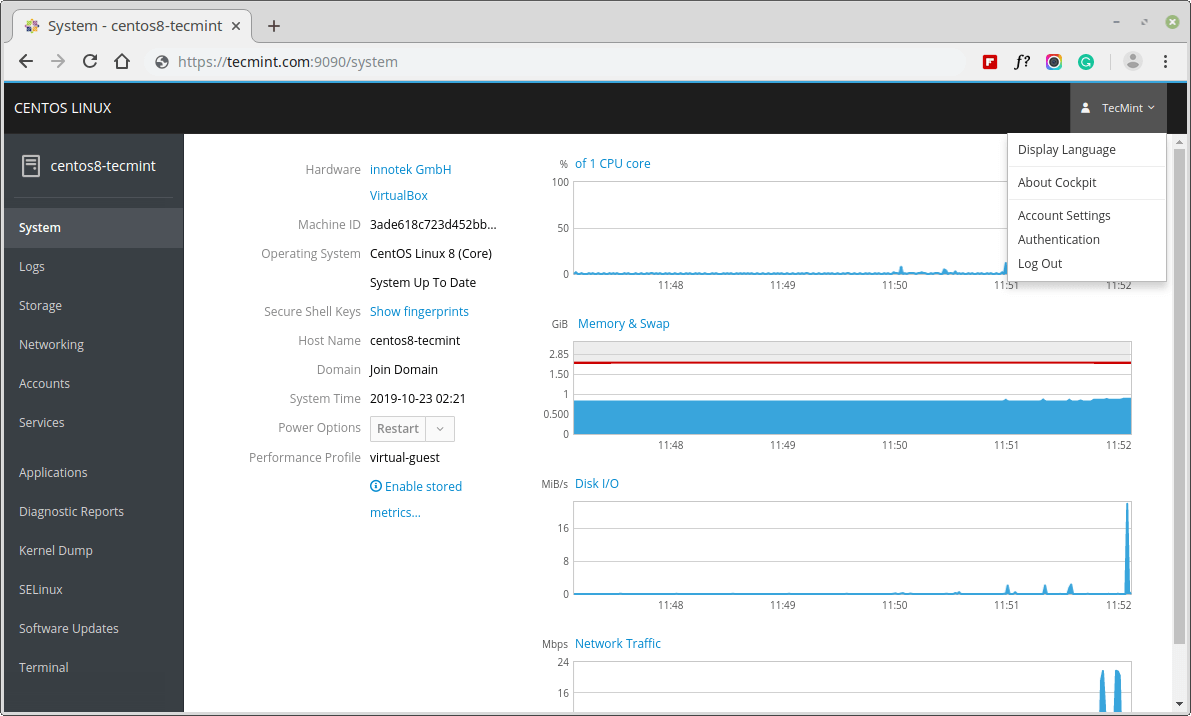
That’s it. Comments: the web is accesible for all the system users, even AD users, on https://IP-OF-MACHINE:9090 (or, if you have a DNS name for it, on https://DNS-NAME:9090). The terminal, when chosen, will come also with the user shell configuration (colors and so on). It’s perfect for a quick check of what’s going on. Simpy try it! 🙂